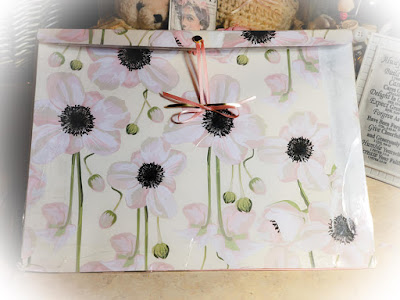
Make Your Own File Folder/Organizer
Tax season, new year organizing, uplifting your workspace for spring, all offer reasons to make your own file folder. I could have bought one, I actually got rid of a nice one recently but the colors weren't right and it was plastic. I wanted something that matched some other new desk and organizing pieces I have made in shabby chic designs. I thought well how hard can it be? So I set out to make my own out of some of the beautiful shabby print patterns I had on hand. It was pretty easy and turned out adorable.
Supplies you will need:
2 sheets 12x12 scrapbook paper
1 sheet printer paper
2 sheets heavy cardstock
Scissors and or glue
Heavy duty clear packing tape
Brads for notebook paper, 1 small, 1 long
Ribbon piece
Place the two pieces of scrapbook paper back to back with the sides of preference showing. Measure with your piece of standard size printer paper (8.5 x 11) as this is the size paper your folder will hold as it slips in sideways.
Leave about a .5 inch border around the sides and bottom of the scrapbook papers. Then trim off the front piece, the back piece will remain in full size using the excess as the top to fold over. It needs to "roll" down rather than just a fold so that there is room for the side expansion and any papers within as it gets full.
Now attach the bottom. You can glue it together but since this is for my own use and I wanted it sturdier, I taped my sides with the clear tape. That also gave me a little more room inside the interior without a glue line.
For the sides, cut your printer paper in half longways. Now fold it accordion style to make the sides. Repeat with other half. Tape or glue the bottoms about a fourth inch up in between the bottom pieces. Tape or glue the sides.
Next add the two pieces of cardstock to the inside. I just slipped them in to sturdy it up. You can attach them if you like.
To make my folder even sturdier, I used the clear tape to laminate it all over. It gives it a nice finish, makes it durable, and can even be wiped down if needed.
All that is left is to add the brads on the fold-over top and to the body. Make holes where you want them and add the brads, adding the brad on the body backwards so the prongs are showing on the front to wrap the ribbon around for closure. Tie your ribbon around the top brad. Bring it down and tie in a bow around the bottom brad prongs on the body of the folder.
That's it, that's how easy it is to make your own personalized folders. You could even add labels to identify the contents.
Thanks for joining me, I hope you have fun making your own file folder.
Shop Designs by Cheryl B, for other beautiful and inspirational pieces.


Comments
Post a Comment